
Overload to Isolate: Switching Play to Create the 1v1
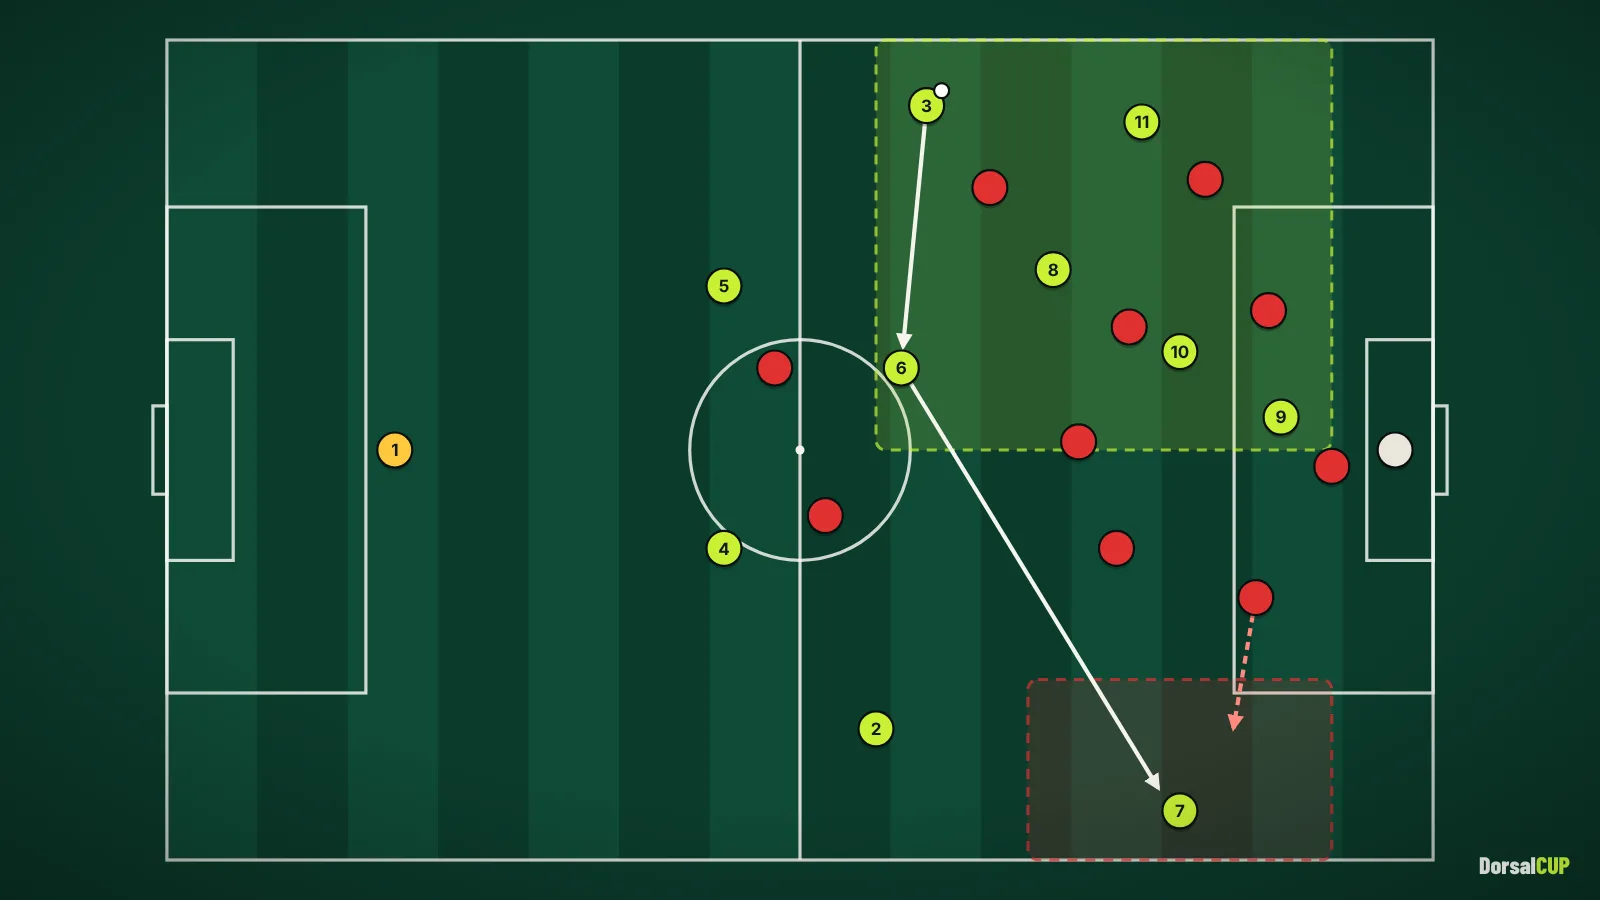
Overload to isolate is a simple idea with demanding execution. The team gathers numbers on one side of the pitch, draws the opponent's block across, and then switches the ball quickly to a winger who has been left alone against a full-back on the far side. The overload creates the problem for the defence; the isolation turns it into a 1v1 in the area where the attacking team's best dribbler is waiting. This article covers how to build the overload, when to switch, what happens after the switch, how opponents respond, and how to train it.
Do you organise tournaments? Create yours for free on DorsalCUP.
In this article
What overload to isolate means and why it works
A well-organised defensive block shifts towards the ball. The ball-side full-back and wide midfielder press, the central players slide, and the far-side full-back narrows towards his centre-back. This is correct defending: the block protects the area where the ball is and accepts space on the far side, because a long switch takes time.
Overload to isolate exploits exactly that behaviour. The attacking team puts more players on the ball side than the block can comfortably handle, which forces it to shift further and compress more. Meanwhile one player, typically the far winger, stays on the far touchline. When the switch arrives quickly enough, that winger receives in space against a full-back who has to run 15–20 metres across to engage him, with no cover behind.
The concept is a combination of two superiorities. The overload is a numerical superiority on one side; the isolation creates a qualitative superiority on the other, a 1v1 between the team's best dribbler and a defender who arrives late and off balance. It is often associated with Guardiola's teams, but it is a general principle that any coach can apply with the players available.
Building the overload
The overload must be genuine. If the opponent can defend the ball side with the same number of players, it does not need to shift, and the switch arrives at a balanced block. The aim is to have at least one more player than the opponent in the area around the ball, so that the block has to bring the far-side wide midfielder and full-back across to cope.
- Who moves to the ball side: the ball-side full-back, winger and 8 are already there; the 10 and the 9 drift towards that half-space; the 6 shifts slightly to offer the inside pass. Some teams also bring the far-side 8 across.
- Who stays: the far winger, high and wide, ideally positioned so that the far full-back cannot see him and the ball at the same time. The far full-back of the attacking team holds a position 15–20 metres behind him to support after the switch and to take part in the rest-defence.
- How long to keep the ball there: long enough to make the block commit (three or four passes, a run into the channel, a dribble that forces a second defender to engage). Not so long that the far full-back has time to settle in a narrow position with his body already turned to the far winger.
The timing of the switch
A switch played too early meets a block that has not shifted. A switch played too late meets a full-back who has had time to adjust. The coach should give the players observable triggers:
- The far-side wide midfielder has tucked into the half-space or central lane. He can no longer reach the far winger before the full-back is exposed.
- The far full-back is narrow, roughly 15 metres or more from the touchline, with his body facing the ball.
- The passer has time and is facing the far side. A switch under pressure, off the wrong foot, is slow and inaccurate.
- The opponent's press commits a further player to the ball side, for example a striker dropping to double up.
There are two ways to switch. The direct switch is a long diagonal from the ball side straight to the far winger, quickest when the passer is a full-back or 8 with the range and the angle. The two-pass switch (short-short-long) goes via the 6 or a centre-back: the ball comes back inside one pass and then goes long from a central position. It is slower but the passes are shorter, and the central passer has a better angle. Teams with less passing range should use it as the default.
Ball speed is part of the timing. A floated switch gives the full-back time to arrive; a driven diagonal, low enough to be controlled with one touch, is what isolates the winger. The receiver's first touch should take him forward or inside, towards the full-back who is still arriving, not back towards his own goal.
The isolated 1v1 and the support after the switch
The winger who receives the switch has a short window: the full-back is arriving at speed and off balance, the far centre-back is still covering the ball side, and the opponent's wide midfielder is running back. Attacking the defender immediately, before he can set his feet, is usually the best decision. Whether to go inside or outside depends on the winger's strengths and on where the covering centre-back is.
Support arrives in waves. First, the far-side full-back moves up to offer an overlap or underlap, giving the winger a 2v1 if the opposition winger has not recovered. Second, the 9 attacks the near post and the far 8 or 10 runs into the half-space channel for the cut-back. The ball-side players who built the overload now move across to occupy the box and the edge of the area (see attacking the half-spaces for box occupation).
Rest-defence must follow the ball as well. After a long switch, the team's centre of gravity moves 40 metres in a few seconds; the 6 and the centre-backs must shift across so that the counter-attack does not start from the space the overload has just left. See rest-defence.
If you run tournaments at your club, DorsalCUP handles registrations, the draw, the multi-pitch schedule and live results for free. The guide how to organise a football tournament walks through every step, from the rules to matchday.
How opponents defend the switch, and how to respond
- A back five. The far wing-back already stands wide, so there is less isolation. Response: overload in the half-space instead, to drag the wide centre-back out, and switch to the winger moving inside into the space between wing-back and wide centre-back.
- The far winger tracks back and doubles up with his full-back. Response: the switch goes to the far full-back arriving on the overlap, or the winger plays back inside to the far 8, who now has space in the half-space.
- The block does not shift fully. The opponent defends zonally and lets the overload play in front of it. Response: then the overload itself is the attack: a numerical superiority near the box is enough to create chances on the ball side.
- Pressure on the passer. The opponent presses the 6 to stop the two-pass switch. Response: use the centre-back as the switching passer, or switch directly from the ball-side full-back if he has the range.
How to train overload to isolate
1. Overload rondo into a 1 v 1 channel
- Space: a 35 × 30 m overload area on one side of the half, and a 15-metre-wide channel along the opposite touchline from the halfway line to the goal line.
- Players: 5 v 3 in the overload area; winger v full-back in the channel; goalkeeper in the goal.
- Rules: after at least four passes in the overload area, the team may switch into the channel. The full-back may leave his starting cone only when the switch is played. The winger has 8 seconds to score or cut back to a runner from the overload area.
- Progression: a second defender may recover from the overload area after the switch; then the full-back starts 5 metres closer to the winger.
- Load: 4 sets of 4 minutes, 2 minutes' rest. Rotate wingers and full-backs every set.
- Coaching points: switch on the trigger, driven and flat; first touch forward; attack the defender before he sets.
2. 9 v 9 + GKs with switch bonus
Pitch 70 × 55 m. Normal game, but a goal scored within 10 seconds of a switch from one third of the width to the opposite third counts double. A wide channel of 12 metres on each touchline may be occupied by only one attacker at a time, which encourages the far winger to hold his position. Play 4 × 7 minutes, 2 minutes' rest.
3. 11 v 11 against a shifting block
The second team defends in a 4-4-2 that is coached to shift aggressively to the ball side. The first team rehearses the overload on one side and the switch on the triggers. The coach counts successful switches (winger receives with the full-back more than 5 metres away) per period. Play 3 × 10 minutes with 3 minutes' rest.
Common mistakes and what to look for on video
- The far winger comes inside. He wants to be involved and leaves the touchline. On video, track his position for the whole overload phase.
- Switching too early. The ball goes across before the block has shifted. On video, freeze at the moment of the switch and check the far full-back's distance from the winger.
- Slow, looped switches. On video, time the ball from passer to receiver; anything much over two seconds over 40–50 metres is likely to be too slow.
- Receiving backwards. The winger's first touch goes towards his own goal and the full-back arrives. On video, check the direction of the first touch.
- No support after the switch. The winger is left 1v2 when the opposition winger recovers. On video, count team-mates within 15 metres of him three seconds after the switch.
Frequently asked questions
What does overload to isolate mean in football?
It means gathering more players than the opponent on one side of the pitch to force the defensive block to shift, then switching play quickly to a player, usually the far winger, who has been left in a 1v1 against a full-back on the opposite side.
When should a team switch play?
When the opponent's far-side midfielder and full-back have narrowed, the passer has time and is facing the far side, and the far winger is in position. Switching earlier meets a balanced block; switching later gives the full-back time to adjust.
Is a direct long diagonal better than switching through the 6?
A direct diagonal is faster if the passer has the range and angle. A two-pass switch through the 6 or a centre-back uses shorter passes and a better central angle, so it is more reliable for teams with less long-passing quality.
Who should the isolated player be?
The team's best 1v1 attacker, ideally placed against the opponent's weakest 1v1 defender. Coaches often decide which side to overload based on that matchup.