
Mid-Block Defending: How to Coach a Compact 4-4-2 and 4-1-4-1
A mid-block is a defensive organisation in which the team waits around the halfway line, keeps its lines close, protects the centre and presses only when the opponent enters a zone or makes a predictable pass. It is the default defensive phase for most teams at most levels, because it balances protection of the goal with the chance to win the ball high enough to counter. This article covers the distances, the references each player uses, how the block shifts, when to jump out of it, and how to train it in a 4-4-2 and a 4-1-4-1.
Do you organise tournaments? Create yours for free on DorsalCUP.
In this article
What a mid-block is for
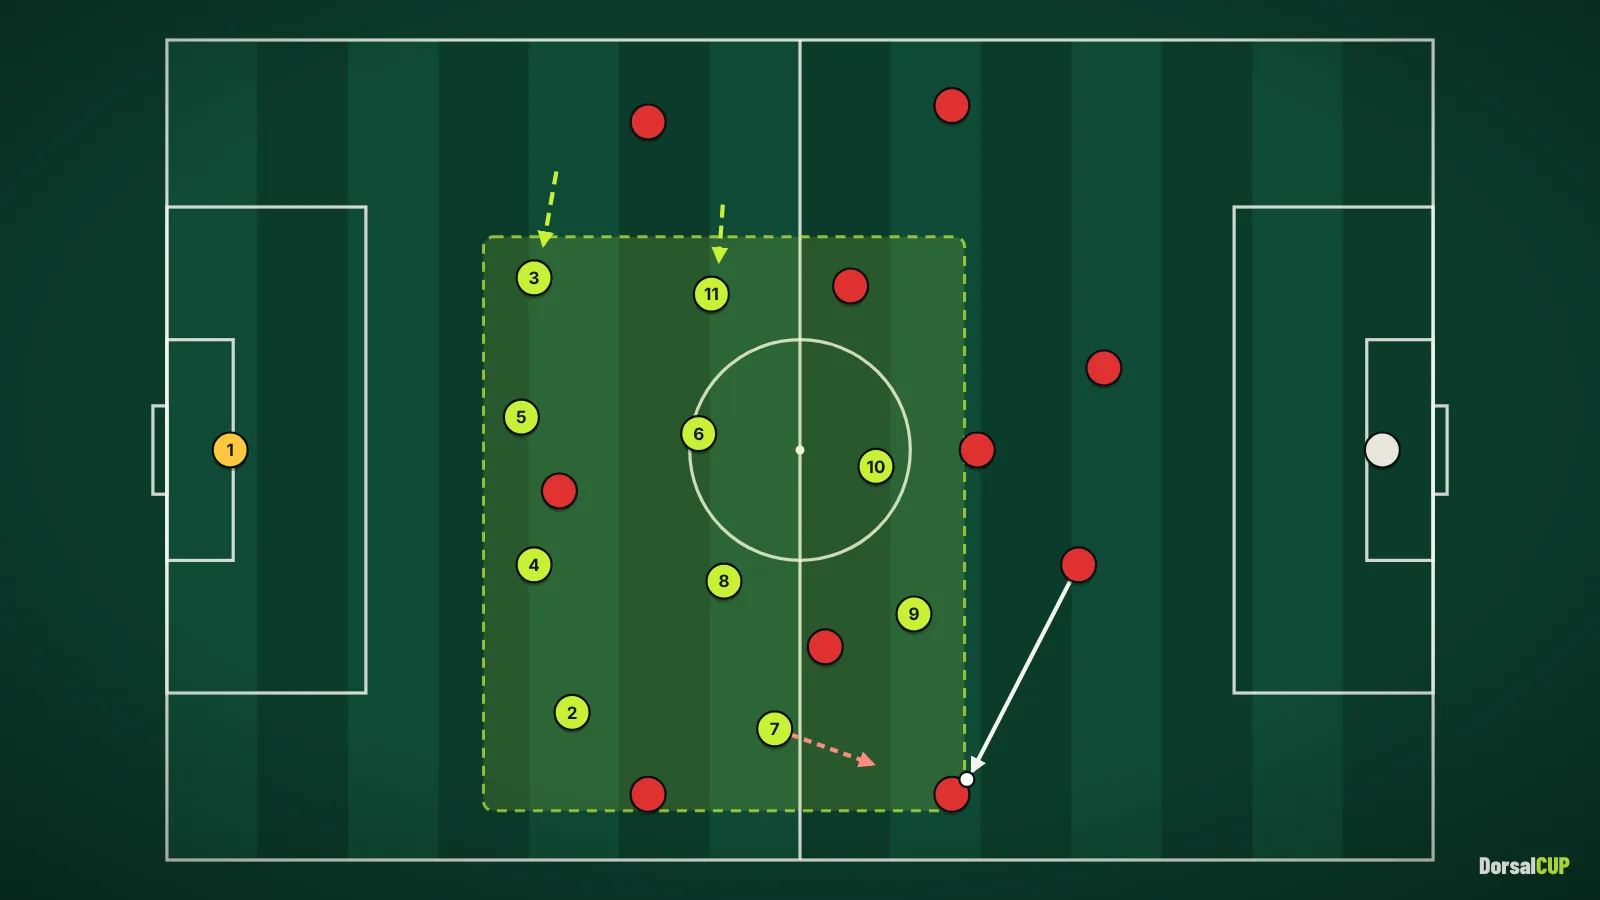
Block height is defined by where the team's first line starts pressing and where the back line sits. In a mid-block, the strikers engage around the halfway line or the top of the centre circle, and the back four holds a line roughly 30–40 metres from its own goal. The opponent is allowed to have the ball in its own half, but not to play through the middle of ours.
The aim is threefold. First, deny central progression: no passes into the space between our midfield and defence. Second, make the opponent play wide and slowly, where the touchline reduces options. Third, win the ball in or around the middle third and counter into the space the opponent's full-backs and midfielders have left. A mid-block is not passive: it is a decision to press selectively, from a compact base, in zones where the team has already prepared numbers.
Teams often associated with a disciplined mid-block, such as Simeone's Atlético Madrid, show the core features clearly: two compact lines of four, short distances, quick shifts and an aggressive collective reaction when the ball enters a defined zone.
Compactness and protecting the centre in a mid-block
Compactness is measured in two directions. Vertically, the distance from the strikers to the back line should be about 30–35 metres, with 10–12 metres between each line. Horizontally, the midfield four should cover around 35–40 metres, roughly the width of the penalty area plus a few metres, when the ball is central.
Protecting the centre is a matter of priority, not just shape. The strikers stay close enough to each other (10–15 metres) to keep the opposition 6 in their cover shadows; if the 6 receives facing forward, the block is being played through. The central midfielders never both leave the central lane at the same time. The wide midfielders stand slightly inside the opponent's full-back, on the line between the ball and the opponent's winger or 8, so that passes inside are blocked and the pass wide is the only easy one.
Shifting as a unit
When the ball moves wide, the block slides. The ball-side wide midfielder approaches the full-back, the central midfielders move across so that the ball-side 8 is level with the ball and the far-side 8 covers the centre, and the far-side wide midfielder tucks into the half-space or even the central lane. The back four slides so that the far full-back is close to the far centre-back. The far side is deliberately left open: the opponent must make a long switch, which is slow and gives the block time to shift back.
Defensive references: ball, team-mate, opponent, space
Every defender is constantly deciding where to stand using four references. The coach's job is to set their order of priority for each position and situation, so that eleven players make the same decision.
- The ball. Its position, whether it is under pressure, and whether the carrier can play forward. Pressure on the ball allows the back line to step up; no pressure means it must drop.
- The team-mate. Distances to the nearest team-mates on the same line and in the next line. This is what keeps the block compact.
- The opponent. Whom I am responsible for in my zone, and whether he is threatening the space behind or between the lines.
- The space. The space I must protect, especially the central lane and the space behind the back line.
In a zonal mid-block, the ball and team-mate come first for most players: the block moves with the ball and keeps its distances, and opponents are handled when they enter the zone. The opponent becomes the main reference inside the trigger zone, when a player jumps and must stay touch-tight. The space behind the back line is the main reference for the centre-backs when the ball carrier has time to look up.
When to jump out of the block
A mid-block that never leaves its shape only delays the problem. The team needs clear rules for who jumps and when. The standard triggers are a pass to the full-back near the touchline, a pass into a player between the lines with his back to goal, a backward pass, and a poor touch.
- Ball to the full-back: the ball-side wide midfielder presses, the ball-side 8 closes the inside pass, the full-back behind him stays on the winger. This is the touchline trap in mid-block form (see pressing traps and triggers).
- Ball into the 10 between the lines: the nearest centre-back steps out aggressively, but only if the back line is covered: the other centre-back and the far full-back narrow at once. The nearest 8 drops onto the receiver from the front to sandwich him.
- Backward pass: the whole block steps up 5–10 metres together. The strikers lead; the back line follows.
- Never: jump from the block when the ball carrier is free, facing forward, with a passing lane behind the jumping player.
The 4-1-4-1 variant
In a 4-1-4-1, the single 6 sits behind the midfield four and protects the space between the lines directly, which allows the centre-backs to stay in the back line. The trade-off is the first line: one striker cannot screen the opposition 6 and press a centre-back. The usual solution is for the ball-side 8 to jump beside the 9, turning the shape into a 4-4-2 for the pressing moment, while the 6 slides across to cover the 8's zone.
If you run tournaments at your club, DorsalCUP handles registrations, the draw, the multi-pitch schedule and live results for free. The guide how to organise a football tournament walks through every step, from the rules to matchday.
How opponents attack a mid-block, and how to respond
- A back three against two strikers. The opponent gets a 3v2 in the first line and the free centre-back carries forward. Response: let the wide centre-back carry and press him with the wide midfielder only when he crosses a pre-agreed line (for example, the halfway line), while the full-back steps onto the wing-back. Or switch to a 4-4-1-1 where the 10 joins the first line.
- Five players in the last line. A 2-3-5 or 3-2-5 pins our back four with five forwards. Response: the wide midfielders drop to form a back six only in the final third; in midfield, the far-side midfielder tucks in and the near full-back takes the wide player while the block shifts.
- Fast switches. The opponent moves the ball side to side quickly to find the block late. Response: shorten the shift distances by staying narrower, and make the far-side wide midfielder responsible for the first pressure on a switch.
- Rotations to drag markers. An 8 drops, a winger comes inside. Response: pass players on between zones rather than following them; communication is the key skill here.
How to train the mid-block
1. Shadow shifting: 8 v 6 around the block
- Space: 50 × 40 m, from our goal line to 40 m out, full width of the penalty area plus 5 m each side.
- Players: back four + midfield four (8) against 6 attackers spread around the outside (two full-backs, two wingers, two centre-backs) who pass the ball but cannot enter for the first 3 minutes.
- Rules: the 8 defenders shift with every pass; the coach freezes and checks distances. Then the attackers may play a pass into a 10 positioned between the lines: the block must jump and sandwich him.
- Progression: add two strikers to defend and a 6 for the attackers (10 v 7).
- Load: 4 × 4 minutes, 2 minutes' rest. Low to moderate intensity; good for an early-week tactical session.
- Coaching points: distances first; far-side tuck; back line steps up on a backward pass.
2. 10 v 10 with a compactness rule
Two-thirds of the pitch, two goalkeepers. The defending team must keep all ten outfield players inside a 35-metre band (coach or analyst calls 'too long' if the band is broken; the attacking team then gets a free kick from where the ball is). The defending team scores 1 point for a regain in the middle third and 2 for a goal within 10 seconds of a regain. Play 4 × 7 minutes, 2 minutes' rest.
3. 11 v 11 against the opponent's build-up
The second team reproduces the next opponent's structure in possession (for example a back three or a 2-3-5). The first team defends in the agreed block and rehearses the jump rules. Every restart comes from the opponent's centre-back. Play 3 × 8 minutes with 3 minutes' rest, two or three days before the match.
Common mistakes and what to look for on video
- Lines too far apart. The back line drops while the strikers press, and the space between lines opens. On video, use the tactical camera and measure the distance from the strikers to the back four at regular intervals.
- Strikers who press but do not screen. They chase the centre-backs and leave the 6 free. On video, freeze when the centre-back has the ball and check whether the 6 is in a cover shadow.
- Far-side midfielder staying wide. It leaves the half-space open for a diagonal pass. On video, look at the far midfielder when the ball is on the opposite touchline.
- Jumping without cover. A centre-back steps out but the other centre-back does not narrow. On video, freeze at the moment of the step and count the players behind it.
- No recovery shape after a failed press. When the press is broken, the block must drop together to the next height. On video, check who sprints back and who walks.
Frequently asked questions
What is a mid-block in football?
A mid-block is a defensive organisation in which the first line engages around the halfway line and the back line sits roughly 30–40 metres from goal. The team stays compact, protects the centre and presses only on triggers, aiming to win the ball in the middle third.
How compact should a 4-4-2 mid-block be?
As a guide, about 30–35 metres from strikers to back line, 10–12 metres between lines, and 35–40 metres across the midfield four when the ball is central. The exact numbers depend on the players' speed and the opponent's threat in behind.
4-4-2 or 4-1-4-1 for a mid-block?
A 4-4-2 has two strikers to screen the opposition 6 and press the centre-backs, but leaves the space between the lines to the central midfielders. A 4-1-4-1 protects that space with a dedicated 6 but needs an 8 to jump into the first line when pressing. Choose based on your players and the opponent's build-up structure.
When should a defender step out of the back line?
When the ball is played into a player between the lines with his back to goal, and only if the back line can cover the space he leaves. The other centre-back and the far full-back must narrow at the same moment.