
Build-Up Against a High Press: 3+2, 2+3, the 4+2 Box and the GK
A build-up against a high press is not won by bravery on the ball. It is won by arithmetic and timing: create a numerical advantage against the first line of pressure, move the ball to the side where that advantage sits, and release the free player before the opponent can shift. This article sets out the structures (3+2, 2+3, 4+2 box), how to use the goalkeeper as the +1, how to respond when the opponent changes their press, and three sessions to coach it.
Do you organise tournaments? Create yours for free on DorsalCUP.
In this article
- Why the first line of pressure decides the build-up
- Choosing a structure for the build-up against a high press
- Manipulating the first line and finding the free man
- How opponents adapt their press, and how to respond
- How to train the build-up against a high press
- Common mistakes and what to look for on video
Why the first line of pressure decides the build-up
Every high press is an attempt to match numbers near the ball and leave the spare man as far away as possible, ideally on the far side or in the last line. The pressing team accepts risk behind it in exchange for forcing a hurried pass in your third. Your job in possession is the opposite: make sure the spare man exists in your first line, and then move him up the pitch one line at a time.
The first line of pressure (usually one or two strikers, sometimes supported by a jumping number 10 or wingers pressing inside-out) is where this calculation starts. If you have one more player than they have pressers in that line, someone can always receive or carry the ball forward unopposed. If they match you, the extra player must come from somewhere else: the goalkeeper, a full-back dropping, or a midfielder dropping between or beside the centre-backs.
Two consequences follow. First, the build-up structure is not a fixed formation but a response to the shape of the press. Second, beating the first line is only useful if the second line is also manipulated. A centre-back who carries past a striker into a crowd of three midfielders has simply moved the problem ten metres forward.
Choosing a structure for the build-up against a high press
Three structures cover most situations at senior and U17–U19 level. Each is defined by the number of players in the first line (around the edge of your box) and in the second line (the pivot zone, roughly 25–35 metres from goal).
3+2 against a two-striker press
Against a 4-4-2 or 4-4-2 diamond press, three players in the first line create a 3v2. The third man can be a natural back three, a number 6 dropping between the centre-backs, or a full-back who stays while the other one pushes on. The two in front (a double pivot or 6 plus 8) sit inside the opponent's two strikers' cover shadows, staggered rather than flat, so that one pass can break the first line.
The key action in a 3+2 is the free centre-back carrying the ball forward. The outside centre-back drives into the space beside the striker, around 15–25 metres from goal, which forces the opponent's wide midfielder to choose: jump onto the carrier and leave our full-back, or hold and let the centre-back keep advancing. Either answer is a positive one for us.
2+3 against a one-striker press
If the opponent presses with a single striker and a midfield three (4-1-4-1 or 4-3-3 with the wingers holding), two centre-backs already give a 2v1. The priority moves to the second line: three players in front of the centre-backs (6 plus two 8s, or 6 plus two inverted full-backs) to outnumber the two or three midfielders behind the striker. The centre-backs split to the width of the box, about 30–35 metres apart, so that the striker's curved run can only shadow one of them.
4+2 box with the goalkeeper as +1
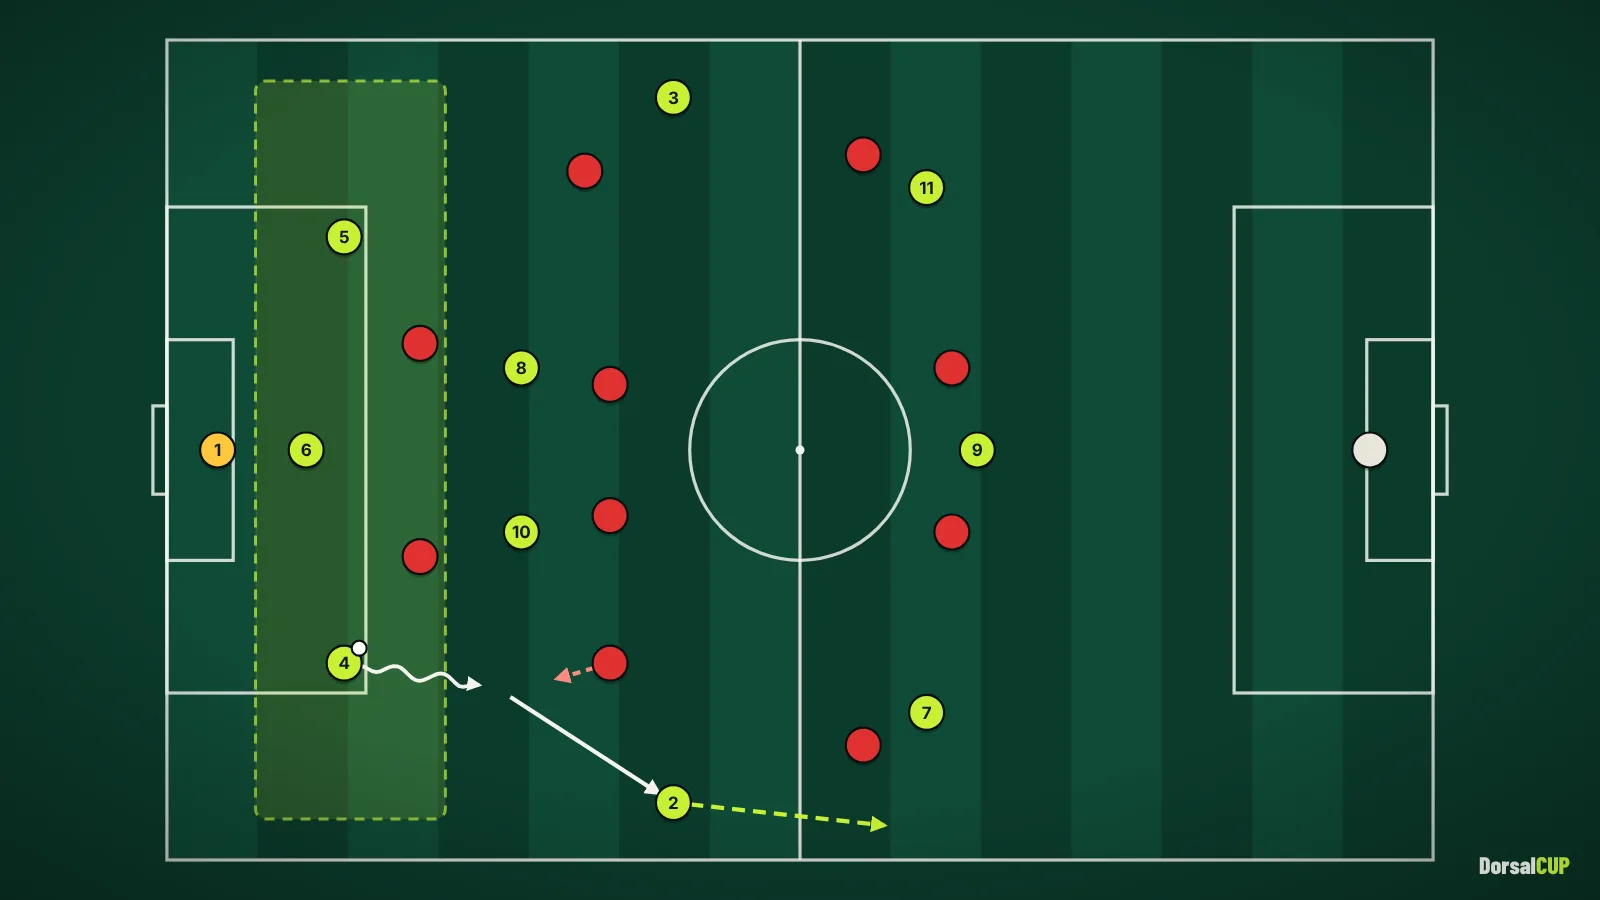
Against a front three (4-3-3 press, wingers jumping inside-out onto the centre-backs), the 4+2 box keeps both full-backs in the first line and two pivots ahead of the centre-backs. The goalkeeper becomes the +1: with the centre-backs split to the corners of the box, the opponent's centre-forward cannot screen the goalkeeper and press a centre-back at the same time. When the winger jumps from the full-back onto the centre-back, the full-back is free; when he holds, the centre-back is free to receive and carry.
| Opponent press | First line | Second line | Usual spare man |
|---|---|---|---|
| 4-4-2 / 4-4-2 diamond | 3 (back three or dropping 6) | 2 staggered pivots | Outside centre-back, then full-back |
| 4-1-4-1 / 4-3-3 with wingers holding | 2 split centre-backs | 3 (6 + two 8s or inverted full-backs) | A midfielder between the lines |
| 4-3-3 with wingers jumping | GK + 2 centre-backs + 2 full-backs | 2 pivots | Full-back when the winger jumps |
Manipulating the first line and finding the free man
Structure creates the spare player; manipulation moves the opponent so that the spare player can be found. Four sub-principles do most of the work.
- Attract before you release. The centre-back waits on the ball until the presser commits, then passes. A pass made before the striker steps is a pass the striker can follow. Think of it as fixing a defender, exactly as in a 2v1 further up the pitch.
- Play away from the curve. Most strikers press with a curved run that cuts off one side. Whatever side the curve is protecting is the side you want to reach, usually through the goalkeeper or a pivot bounce.
- Pivots behind or beside the cover shadow, never inside it. A pivot standing directly behind a striker is invisible to the passer. Two to three metres of lateral movement out of the shadow, with an open body facing the far side, turns a blocked line into a passing lane.
- The goalkeeper is a passer, not a recycling point. A goalkeeper who receives and immediately returns the ball to the same centre-back adds nothing. The goalkeeper should receive on an angle, ideally 8–12 metres from the passer, and look first to the opposite centre-back or full-back.
When the opponent man-marks the pivots tightly, the free man is often found through the third man: the centre-back plays into a striker or 10 who drops, and the lay-off goes to a midfielder arriving facing play. The marker of the midfielder cannot follow both the ball and his man at the same time; the receiver arrives with the opponent behind him and the pitch in front.
How opponents adapt their press, and how to respond
A good opponent will adjust after two or three successful build-ups. The coach needs prepared answers, rehearsed in training, not improvised from the touchline.
They add a presser to the first line
If a 10 or a winger joins the strikers to match your three, the spare man has moved to their second line or to their back line. Respond by dropping a pivot into the first line (3+2 becomes 4+1) only if the far-side full-back is then free for a goalkeeper switch; otherwise, keep the structure and play over the first line into the striker for a set-and-go.
They go man-to-man all over the pitch
Full man-orientation leaves the opponent with equal numbers in their last line and a large space behind it. Positional rotations become less effective because markers follow. The answers are depth and second balls: a direct pass from the goalkeeper or centre-back to a striker in a 1v1 duel, with the two 8s positioned to win the knock-down, and wide players running beyond. At youth level, coach this as a legitimate solution, not as a failure of the build-up.
They block the goalkeeper
Some teams send the centre-forward to stand on the goalkeeper's passing line to one centre-back while a winger presses the other. Now the far centre-back or full-back is free, but the goalkeeper's pass is longer. Coach the goalkeeper to receive slightly to the side of the goal, which shortens the angle to the far side, and coach the far full-back to drop to 18–22 metres rather than staying high.
If you run tournaments at your club, DorsalCUP handles registrations, the draw, the multi-pitch schedule and live results for free. The guide how to organise a football tournament walks through every step, from the rules to matchday.
How to train the build-up against a high press
Train the decision, not the pattern. Patterns become predictable; decisions transfer to whatever press the opponent shows on Saturday. Each exercise below keeps a real goal, a real goalkeeper and a real consequence for losing the ball.
1. First-line manipulation: GK + 3 v 2 into the pivot zone
- Space: width of the penalty area plus 8 metres each side (about 56 m), depth 30 m from the goal line. A 10 m pivot zone marked at 30–40 m.
- Players: GK + 3 defenders against 2 pressers; 2 pivots in the pivot zone marked by 1 defender (total 6 v 3).
- Rules: a point for a pass into a pivot who can turn, two points for a centre-back carrying into the pivot zone. Pressers win the ball: shoot on the big goal within 6 seconds.
- Progression: add a third presser (a 10 jumping) after 4 minutes; the back three must find the goalkeeper switch.
- Load: 4 × 4 minutes, 2 minutes' rest. High intensity for pressers, rotate them every set.
- Coaching points: wait for the press to commit; pivots move out of cover shadows; the receiving centre-back opens his body before the ball arrives.
2. 7 v 5 build-up game to the halfway gates
Use the full width and the defensive half plus 5 metres. Team A: GK + back four + 2 pivots. Team B: 3 forwards + 2 midfielders, who defend three 4-metre gates on the halfway line and counter-attack on the big goal if they win the ball. Team A scores by dribbling or passing through a gate under control. Play 5 × 5 minutes with 90 seconds' rest.
3. 11 v 9 phase of play against a specific press
Full pitch from your goal to the opponent's 30-metre line. Team B (9 players, no back line, plus their goalkeeper's role taken by a scoring line) reproduces the opponent's press from the analysis: 4-4-2 with a jumping 10, or 4-3-3 with wingers inside-out. Team A scores by playing into a target striker beyond the halfway line with time to turn, or into a wide channel behind the opposition full-back. Team B scores on the big goal. Play 3 × 8 minutes, 2 minutes' rest, in the middle of the week. After each block, show the players one clip from the previous set on a tablet: where the spare man was and whether we found him.
Common mistakes and what to look for on video
- Structure without timing. Players reach the right positions but too early, so the opponent sets its press against a static shape. Correction: positions are taken as the goalkeeper receives, not before. On video, check whether the rest of the team is still moving when the first pass is played.
- Pivots flat with the strikers. Two pivots on the same horizontal line behind the first line are blocked by the same shadow. Correction: stagger them by 5–8 metres vertically. On video, freeze when the centre-back receives and check the pivots' relative heights.
- Centre-backs passing instead of carrying. When the first line is outnumbered, a carry is the most powerful action available, yet many centre-backs pass sideways by reflex. Correction: reward carries in training (exercise 1). On video, count how many times the free centre-back had 10 metres in front of him and did not use them.
- Receiving square-on. A full-back receiving with his back to the touchline cannot play forward first time and invites the press. Correction: receive on the back foot, half-turned.
- No plan for the lost ball. Building up against a high press means losing some balls in your own third. If nobody is screening the centre, every loss becomes a chance. Correction: the pivot on the far side of the ball stays central as cover. On video, review every turnover and identify who was protecting the middle.
Frequently asked questions
What is the best formation for building up against a high press?
There is no single formation. Count the opponent's first line and add one: three in your first line against two strikers, two split centre-backs against one striker, and the goalkeeper as the extra player against a front three. Then make sure the second line also has a spare player or a third-man option.
Should the goalkeeper always be involved in the build-up?
Against a press that matches your centre-backs, yes: the goalkeeper is the only player who can create the +1 without moving someone out of midfield. He needs to receive on an angle and look to the opposite side first. Against a passive press, he can stay in a deeper supporting role.
When should a team stop playing out from the back and go long?
When the opponent goes man-to-man with equal numbers and there is no realistic free player, a direct ball to a striker with midfielders attacking the second ball is often the better option. It also discourages the opponent from committing so many players next time.
How do you coach the third man in build-up?
Use a structure where the direct pass to the midfielder is blocked by a marker, and give a bonus for a sequence of wall pass plus lay-off. The key coaching points are the timing of the striker's drop, the lay-off being played into space rather than to feet, and the midfielder moving out of his marker's view before he receives.